How to Utilize S3 Standby and Still Have ‘Always On’ Access to Your Computer or Networked Drives
Introduction:
In spite of increasing awareness in the general public about energy conservation, the ability to utilize low power states on desktop PCs is incredibly underdocumented and widely unused. My goal with this article is to change all that, to help computer users everywhere utilize these low power states without losing any original functionality of their network drives or remote applications. Heck, if you follow this guide, you may even be able to save a buck or two in the process. This guide will attempt to answer the following:
- Why bother? Why do I even want to waste my time on this??
- My computer won’t cooperate! How can I enable a S3 standby state which uses a fraction of the power vs. an Always on or a S1 standby state?
- Now that I have enabled a S3 Standby state, how can I get my computer to wake up without issues?
- I use my computer as an always on a file server / remote desktop / vnc machine. Can I actually take advantage of low power sleep states? I need access to my files at all times!
If you already know, or your computer is already configured to enter the S3 Standby mode, you may skip ahead to the following section: How to use S3 standby states when you need your computer to be ALWAYS ON.
Why bother?
For me, standby modes on my windows machine always seemed like a bother, why would I waste my time allowing my computer to go into standby mode after 30 minutes of non-usage? Why would I wait an extra five seconds for my computer to be responsive again? Yes, for me, power management was not high on my list of priorities. That was until I moved out and starting paying the power bill by myself. After I built myself another computer to accompany my first computer I saw an unmistakable jump in my power bill at the end of the month. How much money could one computer suck up at the end of the month through power consumption?
Well, todays computers with dual video cards, RAID 0 Configurations, and multiple core processors can eat up a lot of juice. High end power supply units are now rated at over 1000 watts. If we take the worst case scenario that a computer uses 400 Watts idling along, we can find some astounding figures.
- I calculated (24 hours per day) * 30 days a month = 720 hours
- Power bills are generally measured in kilowatt hours or “kWh”s. Power rates might be as much as $0.12 per kWh
- Our total cost of having the computer on 24/7 for the month in this scenario would be as follows:
- .4 kW (400watts) * 720 Hours * $0.12kWh = $34.56
That kind of money could pay for a cell phone! If you want to save some cash, keep on reading.
How Do I enable this S3 Sleep State?
If you are lucky, your computer might already be configured properly to enter S3 Standby mode. Why don’t you check and see. Click your standby button (Start – Shutdown – Standby). Now, once the computer is in standby, check the fans on your computer. Are they still spinning? If so, you are not taking full advantage of S3 standby mode. S3 standby mode turns off all the components inside your system except the memory using as little as 1.8 watts. S1 standbymode just puts your components in low power modes and uses only slightly less power than a computer that is in the on state.
If your computer is already configured correctly and your fans have turned off, then you can continue on to the section called How to use S3 standby states when you need your computer to be ALWAYS ON.
If your computer’s fans are still spinning you can try some of these options:
- Check your BIOS settings: Make sure your BIOS Power Management settings are set to S3 standby. Unfortunately if it is not set to S3 when windows was installed, Windows will not install the correct settings to allow the computer to sleep in S3 mode. However, just changing the option in the BIOS will override the windows setting on some computers and you may enter the S3 sleep state anyways.
- Are you using a USB keyboard or mouse? This may be holding you back. For fear of allowing a computer to enter a sleep state that it was incapable of resuming from due to incompatible USB devices, Microsoft decided that if USB input devices were present, it would not allow S3 Standby mode. Fortunately this is easily bypassed through use of a registry entry. Just open regedit and enter the following registry entry as described in this Microsoft Knowledgebase Article:
HKEY_LOCAL_MACHINE\SYSTEM\CurrentControlSet\Services\usb
“USBBIOSx”=DWORD:00000000
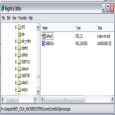
Entering this registry key, then rebooting should allow you to enter the S3 sleep state even while using USB peripherals in Windows XP. - If your computer enters Standby mode, but then immediately starts back up, your USB devices may be giving you problems, check your computer’s BIOS settings and disable (or enable) USB power on options, changing these settings can allow your computer to function properly.
Now if you are lucky, your computer is now configured for an S3 Sleep state. Congratulations!
Now you can select a power profile in the ‘power options’ control panel icon that allows your computer to enter standby mode after a user specified number of minutes!
And now We can finally move on to:
How to use S3 standby states when you need your computer to be ALWAYS ON
This section of the article will cover how you can make S3 standby states viable when a computer is acting as a file server, a remote access point, vnc host or any other kind of network activity. In my case, I have two computer, one is a media center computer in the living room, the other is a more powerful Core 2 Duo machine which has several large hard drives which serve as a repository for videos media and music, which need to be accessible on demand. I have figured out a few tips allowing the computer to wake from an S3 state and serve the files or provide the access required without any need for “magic packet” software or any other utilities other than windows itself. It simply wakes whenever it senses activity routed to it’s specific IP address. Here are the steps you can take to configure your own machines:
I have found that the most reliable way to make this work is set static IP addresses on your local network. This means that rather than having the router automatically assign an IP address on your local network, your network card decides on a static or constant IP address. This makes routing traffic around on your ports much easier. Follow these steps to set a static IP:
- Navigate to the Control Panel: Doubleclick on Network Connections
- Right click your Local Area Network: Choose Properties
- Select Internet Protocol (TCP/IP)
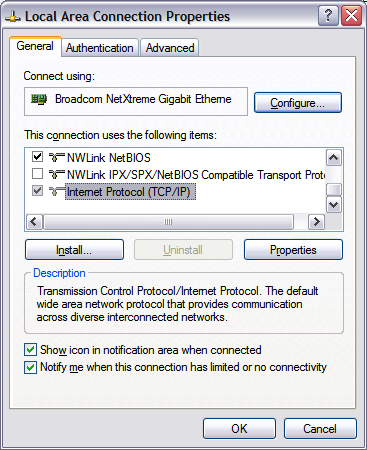
- Click Properties.
- Set your IP address manually: (ip address generally can be whatever you want it to be within certain limits, the subnet mask, default gateway, and DNS settings should correspond to your particular router. Check your router manual for more information)
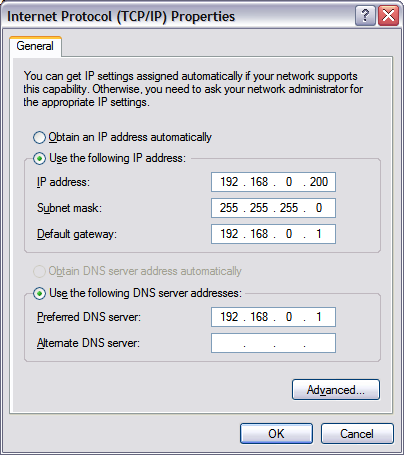
- Once you have made your changes, click ok and allow your network adapter to reconfigure itself and reconnect to the network.
- Test your network to see if you still have connectivity by pulling up a browser or checking network accessibility.
Now we can move on to configuring the computer to wake up when it senses trafic on it’s static IP address.
- Boot into your BIOS, make sure all WOL and network wake up options are enabled. Refer to your manufactuer’s motherboard manual.
- Boot back into Windows: Navigate to the control panel: Doubleclick on Network Connections
- Right click your Local Area Network: Choose Properties
- In the first box it should show your network adapter. Click ‘Configure’
- Navigate to the ‘advanced’ tab: Select ‘Wake Up Capabilities’

- Every network device varies a bit, you want to enable all capabilities, choose ‘both’ or ‘magic packet and wake on pattern’
- Click the Power Management Tab: check the box that states: “Allow this device to bring the computer out of standby”

Once you have selected these options and rebooted, you should now have set your computer up with a very powerful configuration. You can now allow your computer to go into standby mode, yet whenever your network adapter senses any activity on your specific Local ip (in my case: 192.168.0.200) it will quickly resume from S3 standby and perform the functions requested. As soon as the network is not being utilized, your computer will return to standby after the allotted time you have set in your power options settings.
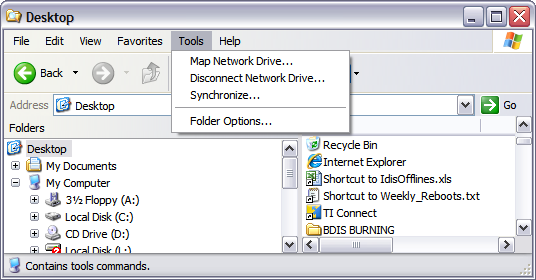
Tips for Mapping network drives on an S3 standby enabled PC.
I use mapped drives to easily access files on my file serving computer. I have found that when mapping network drives from remote machines trying to get files on your S3 enabled server, it is most reliable if you setup your shares based on the IP address of the machine rather than the network name.
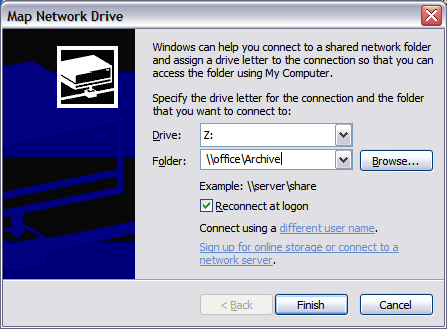
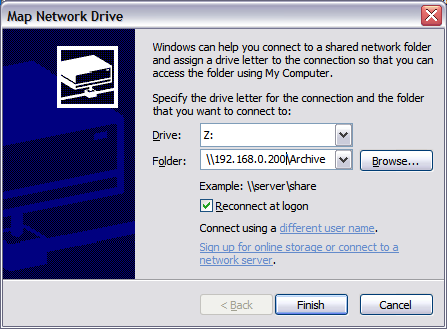
Here we are mapping a network drive:
So rather than mapping the drive to ‘office’ I will map it to the IP address ‘192.168.0.200’:
Conclusion:
In this article we have described how it is really possible to utilize an S3 power state while retaining constant and immediate access to your network drives, shared folders, remote desktop and VNC. By doing this you do away with having to pay the power bills that come from running a computer full time. The methods discussed here will allow you utilize S3 sleep states to their full potential, conserve energy, the environment and perhaps the size of your wallet, without any compromises.
-Cameron Butterfield
“cbutters”
-If you enjoyed this article; There are many more! Click Here to go to the main page!
Please comment. Thanks.